dvis3yzawwgr9p4du4g7rcqsie1vi7

Commercial Flight Maneuvers for Everyone!

Commercial-level pilot maneuvers provide a wonderful fresh challenge for every pilot seeking to improve. These are fun and teach correct rudder usage when flown properly. Many pilots at the private level do not understand or apply correct rudder inputs. “Rudder deficit” is a primary reason for LOC-I. Search out a qualified instructor and take your flying to a higher level of proficiency with some commercial maneuvers. Learning new skills and extending your flight envelope creates greater flight safety and is also great fun! These maneuvers are a gateway to an upset recovery course and aerobatics – but these should be mastered first to get full value from this kind of advanced training.

Mastering commercial maneuvers requires an eyes-out aggressive flying style at the edge of the flight envelope. This begins with a thorough aerodynamic knowledge of the forces at work. The heart of all the commercial maneuvers is a concept called “cross-coordinated.” When you are climbing in a chandelle or navigating your way through a lazy eight you are often applying “crossed controls” to create coordinated flight. The control inputs and forces at work are not initially intuitive. Mastery requires study and practice to internalize a solid “feel” for the airplane during this more aggressive commercial-level maneuvering. And though all these maneuvers are “non-operational,” but you will be rewarded with much more precise (and safer) flying skills as well as a greater sense of confidence and control.

Step one in discovering commercial maneuvers is getting the eyes outside and rediscovering aggressive VFR flying; “yank and bank.” Most pilots in a normal flight training progression just completed an instrument rating (smooth standard rate turns with reference to their trusted instruments). Commercial training can come as a shock, requiring outside visual references and a “tuned up butt” to properly sense and correct yaw. Try some private pilot steep turns at 45 degrees and work up to 60 degrees. Then reverse at 180 degrees of turn and work up to “60/90s” (reversing a 60-degree banked steep turn after 90 degrees of turn). This is “old school” flying – find a good instructor to help you. This will get a little sweat going as well as demonstrate the need for an outside sight reference and positive control usage.

Step two is serpentine climbing 30 degree turns right and left with full power and a Vx attitude. This will quickly demonstrate the need for right rudder while climbing in a left turn and left aileron while climbing in a right turn. Initially, this feels “unnatural” for many private pilots, but this is the beginning of understanding “cross-coordination” and will progress into chandelles. Your pattern crosswind turns will be immediately safer with your newly-mastered “cross-coordination.”

A series of  climbing and descending (coordinated) wingovers – working toward a lazy eight – will demonstrate the need for quick and accurate rudder usage as the wing loads and unloads. Suddenly pilots are “flying again” after 40 hours of instrument standard rate turns (or years of rope-a-doping around the pattern); fun! These climbs and descents also illustrate the changing yoke forces necessary to maintain specific flight attitudes as the speed of the aircraft changes the effectiveness of the flight controls.

The last step in this introduction to commercial flight maneuvers is some slow flight and stalls first straight ahead, then turning. Flight training is an opportunity to fly at minimum control speed with the horn blaring (just don’t do it on a flight test – the FAA is sensitive about this). Bank 30 degrees right and left aggressively at the edge of a stall. Coordination is essential and LOTS of rudder is required to pivot left and right on the edge of a stall. Then demonstrate an old-style power off stall recovery letting the nose fall through the horizon with the yoke all the way back (stay stalled till the nose is down). As an instructor, when your pilot-in-training sees this dramatic nose-down attitude (while still feeling the stall) some understanding of angle of attack will be immediately built. (The angle of attack indicator in every plane is how much chrome is showing on the control yoke shaft).

Turning stalls recovered without power (just releasing AOA) are the last maneuver in this sortie as you descend turning right and left while stalling and recovering. This again shows the need for coordination and the power of AOA for recovery. Turning stalls are part of the Private Pilot ACS and often missed during initial training. Engage a qualified instructor and master some commercial maneuvers. SAFE has a catalog of “Extended Envelope Maneuvers” free to all. Soon you will add finesse, safety (and FUN) to your regular flying. Fly safe out there (and often)!


Enjoy the new courses available to members on the new safe website. And please download and use the (free) SAFE Toolkit App. This contains all the references a working CFI needs plus provides continuously new safety content.

See you at Sun ‘N Fun 2023 at “Charlie Hangar” Booths #19/20. SAFE spnsors and members please join us at Sunset Cafe for a free SAFE breakfast Thursday (March 30th), 8am. (Get your free ticket here)

SAFE developed an insurance program just for CFIs! When you are an independent CFI, you are a business (and have legal exposure). This program is the most reasonable but also comprehensive insurance plan you can have (and every agent is a pilot!)


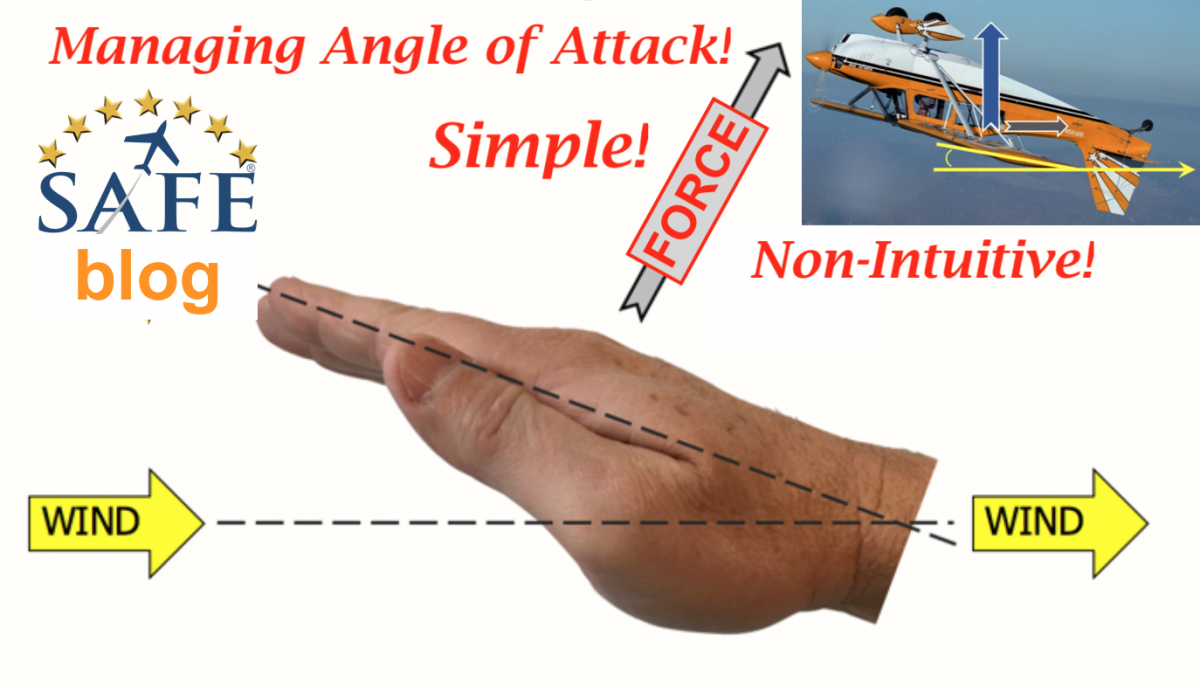
WANTED: Angle of Attack Managers

This is one in a series of posts by special guest authors about SAFE’s new CFI-PROficiency Initiative™ (aka SAFE CFI-PRO™). The goal of the initiative is to make good aviation educators great!

Aviators, airmen, aviatrices—a few of the other words used to describe pilots. Yet none of these words reflect what we really do. Ultimately, pilots are angle of attack managers. Let’s have another look at AOA.

As David St. George notes in “Invisible Angle of Attack,” AOA is the difference between where the airplane is pointing and where it is going. Wolfgang Langewiesche describes the importance of AOA thus:

“If you had only 2 hours in which to explain the airplane to a student pilot, [AOA] is what you would have to explain. It is almost literally all there is to flight. It explains all about the climb, the glide, and level flight; much about the turn; practically all about the ordinary stall, the power stall, the spin. It takes the puzzlement out of such maneuvers as the nose-high power approach; it is the story of the landing.”

AOA implies two things: wind and an object around which the wind is flowing. Most everyone has played with AOA before. Remember sticking your hand out of the car window when you were a kid? What happened when you tilted your hand into the oncoming wind? “It went up!” is the common response. Reflect more deeply on the experience, however, and you’ll notice that your hand actually moved upward and backward. If we want to get technical about it, we could call the “up” part Lift and the “back” part Drag.

We’ve all seen examples of unusual things being forced to fly, too. For example, tornado-strength winds can cause even the most reluctant Holstein to go airborne.

A high velocity jet of air precisely aimed at a Snap-on screwdriver can cause it to hover (courtesy of SAFE member Shane Vande Voort—please don’t try this at home!).

And though we might describe a wing as having a “top” and a “bottom,” Lift- and Drag-producing AOAs are possible on either side.

AOA is discussed primarily in the context of the airplane’s main wing. But at the correlation level of learning, we see the entire airplane as an assembly of wings all of which are subject to the principles of AOA. The propeller, for instance, is a rotating wing. Main and jury struts are often symmetrical wings streamlined to minimize drag. “Aileron” is French for “little wing.” And our primary flight controls are AOA controls. The elevator controls the AOA of the main wing (aka pitch control).

Ailerons control local AOAs (typically the outboard part of the wings, aka roll control).
Rudder controls the AOA of the fuselage (aka yaw control).

Our job as instructors is to teach our trainees how to manage these AOAs to achieve desired performance outcomes. Although AOA itself may be invisible, changes in AOA can be sensed and its trend interpreted. In the visual flight environment, this means coupling aeronautical knowledge with sight, sound, and feel to manage our controllable AOAs.

Before we climb into the airplane, for example, we know that the combination of a high power setting and a slow airspeed during the takeoff phase will yaw the airplane. But we want coordinated flight during this particular takeoff. That will require a certain amount of rudder to manage the AOA of the fuselage to cancel the yaw. What does yawed flight look like during takeoff? What does it sound like? What does it feel like? What does it look and feel like if we try to use aileron to correct for the yaw instead of rudder? All of these questions can be explored in the practice area without staring at the slip/skid ball. The lessons learned can be applied during subsequent takeoffs.

Whether it’s pitch, roll, or yaw, changes in AOA manifest as changes in one or more of the following: attitude, G-load, control pressure, control displacement, and often sound. In the case of elevator inputs, add airspeed to the list of cues.

For fun, test your understanding of AOA with the following thought experiments. Imagine you are at an airshow watching a competent aerobatic pilot fly a capable aerobatic airplane.

1. The airplane makes a knife-edge pass from your right to your left at precisely 90 degrees angle of bank.
a. Where is the nose of the airplane pointing relative to its flightpath, and how is the pilot making that happen?
b. What is the pilot doing with the elevator to make the airplane fly down the runway?
c. What is the AOA of the main wing?
d. What is the pilot feeling?

2. The airplane climbs along a perfect vertical line.
a. In order to remain on the upline before pivoting in a Hammerhead, what is the pilot doing with the elevator?
b. Ultimately, what is the AOA of the main wing during the upline?

Want to learn more ways to push learning to the correlation level? Attend SAFE’s inaugural CFI-PRO™ workshop in Frederick, MD on October 2–3, 2019!

Join SAFE to support our safety mission of generating aviation excellence in teaching and flying. Our amazing member benefits pay back your contribution (1/3 off your ForeFlight subscription)! Our FREE SAFE Toolkit App puts required pilot endorsements and experience requirements right on your smartphone and facilitate CFI+DPE teamwork. Our CFI insurance was developed specifically for CFI professionals (and is the best value in the business).

The Secret of Pattern Safety!

We all know a majority of accidents occur in the traffic pattern; especially during descent and runway line-up. But the burning question is “why?” Basically, we fear the wrong things. Most pilots don’t understand the basic flight dynamics of descending turns and the real consequences and risks of unstabilized flying. With a little knowledge, practice and a committment to artful flying excellence, we all can do better and fly safer.

But instead pilots try to achieve safety by never banking over 20 degrees, flying huge patterns and becoming increasingly timid.  Others advocate oval patterns to eliminate the steeper corners of the pattern (but fly a constant turn). Why not just “learn to turn” correctly and safely in the first place? I watch in amazement as pilots horse their planes around to final with varying bank angles and wildly changing airspeeds (hold on partner!) exhibiting a lack of stability, ground track control and overall discipline. The physical problems with patterns are obvious but they are driven by a lack of understanding risk and knowledge of the forces at work.  This lack of stability and control continues directly into professional piloting where unstable approaches and overrun accidents are the #1 cause of accidents in corporate jets. As aviation educators (and pilots) we need to do better. Understanding some basic flight dynamics is critical to success.

Safety and a passion for pattern precision starts with an understanding of the invisible angle of attack (AOA) where the real risk hides. Simply presenting and thoroughly explaining  a set of pictures like the ones above  can jump start the conversation and clear up some very common misunderstandings. When asked which aircraft depicted above has the greatest angle of attack (AOA) almost every pilot (and many CFIs) pick the nose-high Cessna. The “a-ha” learning opportunity is that the AOA is the same on both of these aircraft. And that means the airplane in the glide is just as close to a stall as the nose-high plane on the left (now risk becomes clear). If we never demonstrate a stall with the nose *below* the horizon a new pilot in training will never understand AOA and how accidents occur. There is a “natural” (but erroneous) assumption that with the nose low, we are “safe” and “all stalls occur with a nose-high flight attitude” – wrong and reason #1 for pattern accidents! Even if this error is not stated verbally, practicing and demonstrating only nose-high stalls builds this myth and masks the true danger of descending turns.

In our initial flight instruction teaching the basic level turn, we emphasize that when a plane is banked, the lift vector is redirected to the horizontal (to create the turn) and no longer entirely opposes gravity. Consequently, some back-pressure is necessary to maintain altitude in a level turn. And during initial flight training, we build up this rote, muscle memory “bank and add pressure” response through repetition. But when we move on to the descending turns, is essential to emphasize this previously memorized script is incorrect.

A descending turn is completely different and requires “bank and release” because the added load of the bank will add drag and cause a decrease in airspeed (and greater AOA) unless back pressure is relaxed (and trim is a wonderful and underused tool here). Pilots descending tend to lose airpseed on every turn; they are banking and inappropriately adding back pressure (or failing to appropriately release). This is reason #2 of the “why” that explains many pattern accidents. This failure to understand the basic flight dynamics of the turn and AOA (also probably add some initial “ground fear” of being low) causes pilots in training bank to mishandle AOA. And once bad habits are extablished in training, they never go away.

How “eyeball friendly” is your trainer?

Outside visual reference and proper trimming are also vastly undervalued in modern flight training. If the airplane is trimmed properly and the pilot in training knows the proper, predictible flight attitude for a descent in various configurations, the stabilized control of the aircraft is much easier. Unfortunately, many pilots in training are inappropriately focused inside on the panel chasing the airpseed indicator instead of setting a flight attitude with outside references. Personally, unless my pilot in training can fly the whole pattern visually, with eyes outside (and the instrument panel covered) I hesitate to even consider a solo. Fly safely out there (and often).


And of course, more on this and other key educator tools at our Oct. 2/3 SAFE CFI-PRO™ workshop at AOPA in Fredrick, MD. The registration form will be live in a week. This will have Hilton and Marriott rooms at a discount and a networking dinner at the National Aviation Community Center!

Apple or Android versions.

Join SAFE to support our safety mission of generating aviation excellence in teaching and flying. Our amazing member benefits pay back your contribution (like 1/3 off your annual ForeFlight subscription)! Our FREE SAFE Toolkit App puts required pilot endorsements and experience requirements right on your smartphone and facilitates CFI+DPE teamwork. Our CFI insurance was developed specifically for CFI professionals (and is the best value in the business).

Start With Basic Honesty!

As a flight instructor have you been guilty of telling eager beginners that “learning to fly is easy”? Do you personally really believe that often used phrase? If you think back to *your* initial training don’t you remember those dark moments of discouragement and disappointment that are inevitably part of this process? Learning anything complex is not all sunshine and light. Struggle, disappointment and personal growth are all a necessary part of learning to fly. But if you were successful, at some point some caring person helped you through those  dark times of doubt – a mentor or hopefully a compassionate, honest aviation educator? We know from survey data that a caring and compassionate CFI is  the essential magic element responsible for success in flight training. In our enthusiasm to sell flying we might be doing damage by describing learning to fly as “easy.” I think we all would benefit more by being honest; the result would be a better completion rate and more happy pilots in training. This would help to insure the health of our aviation industry and give us many more lifetime clients.

In our eagerness to sell flying we have  failed our future pilots- it all starts with that initial interview. I personally believe this is a major reason we see the 80% rate during initial pilot training; we need to more accurately communicate the challenges and control the expectations here.  Present the honest story, with the future benefits.  Certainly “sell the sizzle” but do not diminish the challenges.

My personal formula for introducing the subject goes something like this; “Learning to fly is a great challenge and provides amazing adventure and fun. This process does require hard work, effort and your time and money. In addition to acquiring the obvious physical skills it also requires personal growth and assuming responsibility; it rewards a ‘take charge’ personality and some courage. Your investment of time, money and effort will be paid back a hundred fold if you stay the course and work through the process; being a pilot opens up so many worlds of fun and adventure. And the learning and discovery can be fun and rewarding; we’ll work through the difficulties together”

The professional aviation educator has to commit to being more than just a technician in this learning process. A great CFI is a coach, motivator and practical psychologist in addition to guiding the skills part (did you know you signed up for this?). If you are a pilot seeking a CFI look beyond the badges, patches and accolades. Look for a true committed professional, a warm-hearted “people person” who cares about your success and has a track record of happy pilots.

50KsoloEvery initial interview between potential pilot and educator is similar to an “engagement letter” that any lawyer would write.  This tool should be part of any professional relationship involving a lot of time and money (and its usually in writing). Unfortunately in flying, honesty is rare, we tend to sell sunshine and light and diminish the struggle. And if we present the FAA “40 hour myth” we are also lying. I have certainly finished some very talented students in 35 hours (141 school), but we all know that is not the “average” and not an expectation I would promote to the general public. Doubling the 40 is a more reasonable target (and I don’t embrace other FAA minimums – like VFR in “one mile clear of clouds” either). Someone for whom completion is not possible (or will take excessive time) should be informed early in training (and gently terminated if the project is not going to work). Again AOPA survey data reveals that the reason people drop out of flying is not the cost, it is the unrealistic expectations presented in the early interview and a lack of value. If you initially told them $12K to be a pilot and we are passing $18K and still in X-C you are going to have problems. This is no different than  remodeling contractor promising your new bathroom for $20K then proceeding to charge $35K (and its still not done).

The critical part in flight training that differs from other professional models is the level of personal commitment and caring required of the effective aviation educator. We are not just technicians who perform a sterile service or twist a few screws to create a performance. We need to be personally involved and coaching our pilots in training to get them through the goal posts. It requires caring and compassion and that is rare in our modern world of aviation instruction. I don’t think they teach empathy or compassion during initial training at our “puppy mill” CFI academies. This is acquired with life experience and comes with time. But it is the essential trait if you want to be a successful aviation educator; you have to care. This is the magic that makes flight training work. Fly safely out there (and often)


Apple or Android versions.

Join SAFE to support our safety mission of generating aviation excellence in teaching and flying. Our amazing member benefits pay back your contribution (like 1/3 off your annual ForeFlight subscription)! Our FREE SAFE Toolkit App puts required pilot endorsements and experience requirements right on your smartphone and facilitates CFI+DPE teamwork. Our CFI insurance was developed specifically for CFI professionals (and is the best value in the business).

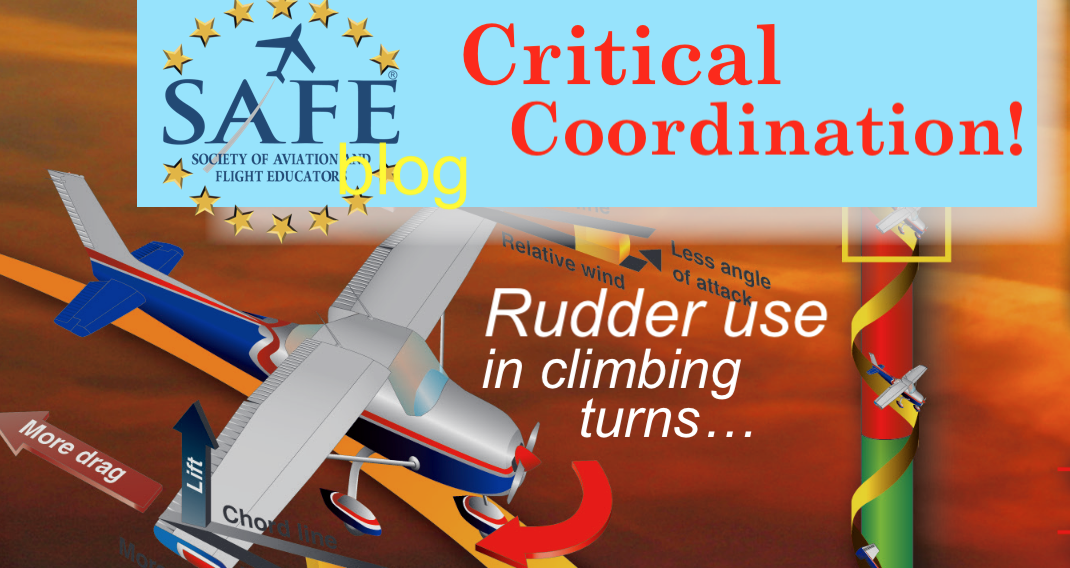
“Artful” Control Usage; Pattern Precision

Rudder use in climbing turns is critical to safety in the pattern!

Flying around the pattern with perfect coordination is more difficult than most pilots think. Its also essential to safety because this is where the majority of accidents happen either from collisions or loss of control. Aviation educators must be insistent on thorough understanding and proper control usage if we are going to make better, safer pilots.

The correct actions and control pressures required in the pattern often go against what initially seems “natural” to new trainees; their “naive rendition.” Aviation educators need to patiently unpack and overwrite naive assumptions with correct theory and control usage. These are “trained responses” and require lots of practice to become embedded, implicit scripts that are constantly ready for use by the savvy pilot. There are lots of negative transfers from our more common transportation activity; driving.

Every educator will get arguments that mastering the correct control application is unnecessary because what they are doing “already works” or they will correct sloppy control later; neither is true. The basics must be mastered early and practiced often in flying or you have embedded a ticking bomb in your procedures that will surface later when a critical surprise situation requires immediate and accurate control skills to save the day. Marginal performance from power loss or density altitude challenges can suddenly require us to squeeze every ounce of performance from our aircraft. For safety and efficiency we need to unpack some of these less studied effects and work to master correct coordination.

A common example of “instinctual control” is seen in new pilots on initial power application and rotating to climb for take-off. These new learners counter left yawing tendencies with aileron;  a powerful negative transfer from driving. Many experienced but rusty pilots still exhibit a trace of this incorrect control input. Correctly canceling the yaw with rudder is a trained response that has to overwrite “intuition” and driving habits through continual reinforcement. With practice, the nose should rise straight and steady to a know climb attitude with outside reference and rudder pressure canceling yaw. (Extra points are awarded for not wagging left and right as the climb progresses) As the plane leaves the ground and starts climbing, some even more subtle control pressures are necessary to stay coordinated.

After rotation the pivot point for elevator shifts from the wheels to the CG point (forward of the wing) so a release of back pressure (lower nose) is required (nosewheel plane). Additionally, the increase of induced drag upon leaving ground effect requires a subtle relaxing of back pressure. The proper climb picture required should be memorized and acquired with visual outside reference. The view outside will also allow a pilot to see that left aileron is necessary to keep the wings level in the climb. Right rudder pressure causes a proverse roll to the right (more prominent in some planes than others). This subtle force surprises even experienced pilots when it is pointed out. Climbing coordinated requires some cross control pressure to keep the ball centered and the wings level; “cross-coordinated.” In the proper configuration, most planes exhibit 15% greater climb rate when correctly coordinated on the takeoff since they are stramlined and more efficient. (Try gliders to experience how necessary proper coordination is to performance) Though 300-700 HP can pull almost anything airborne even sideways, bad coordination in emergency situations is the killer. It is amazing that 24% of fatal accidents occur on the take-off and initial climb. Many pilots just don’t value all the challenges here – “hard to miss the sky!”

During the initial high-power, low-speed climb, most singles require right rudder pressure to center the ball. This induces a right rolling moment. Left aileron input against the right rudder is subtle but necessary to keep the wings level as the ball is centered. Once the plane is “subtly cross-controlled” in this manner, it will climb much better because drag is minimized.

The standard left crosswind turn in the patterm  is an even greater challenge to keep properly coordinated for new pilots; right rudder is required! Recent accident data indiates the climbing crosswind turn in the pattern may be even more dangerous than the well known base-to-final turn. Pilots turning left in a climb usually don’t apply the proper right rudder pressure to cancel the prominent left-turning forces since is initially “so unnatural.” As mentioned in many of these blogs, flying well requires many counter-intuitive trained actions to be safe. Remember, since both wings have equal lift in a stabilized turn, and the left-turning tendencies are still present and require right rudder – we are still climbing! Unfortunately, many pilots skid around their left climbing turns (standard right-hand patterns would be safer for control). Pilots who have tried chandelles – a more extreme climbing turn – are very familiar with the cross-coordination concept here. But even in less extreme left crosswind climbing turn, right rudder is essential. But why is flat-footed flying dangerous here?

In skidding turns, the force of roll and yaw are both acting in the same downward direction; they are coupled and adverse in effect – pro-spin. And when pilots inappropriately counter this skidding force in a climbing left turn with more aileron, this incorrect control application increases the angle of attack on the lower, slower wing. This makes the lower wing more likely to stall first and tuck into a spin. This illustration from Bold Method provides a depiction of the many problems with a skidding turn. Correct control application must be taught relentlessly by a committed aviation educator and studied carefully by the pilot in training to become an embedded habit. And this is particularly hard to master since it is a llearned action that is initially completely counter-intuitive. But anything less is clearly unsafe.

The skidding turn seems to be always depicted in a nose low, base-to-final turn in the pattern. This is where pilot action creates the skid with rudder to inappropriately increase the rate of turn. But you will see far more skidding turns in a climbing left turn if you pay attention. The skid here only requires pilot inaction. All the powerful left-turning tendencies create the skid that must be corrected by pilot action. These left-turning forces must be actively countered with right rudder to prevent a skid. This dangerous tendency is especially common in bigger planes and more powerful engines in the climbing turns. Do the math and you can discern that this is often demonstrated by the “captain of industry” – an affluent step-up client who bought a big new plane. This person is allegedly a “trained pilot” but often really requires remedial instruction to be safe. The professional aviation educator must be firm here to address and fix these coordination problems. Acquiescing to poor control or bad technique is unprofessional and unsafe; it’s how we are losing control in our aircraft every day. Fly safe out there (and often)!

An appreciative nod to Michael Maya Charles and his amazing book “Artful Flying” (SAFE members get 20% off) which continues to inspire me daily. Flying well is more than just being safe. It is the daily joy of pursuing excellence in aviation; flying artfully!


Apple or Android versions.

Join SAFE to support our safety mission of generating aviation excellence in teaching and flying. Our amazing member benefits pay back your contribution (like 1/3 off your annual ForeFlight subscription)! Our FREE SAFE Toolkit App puts required pilot endorsements and experience requirements right on your smartphone and facilitates CFI+DPE teamwork. Our CFI insurance was developed specifically for CFI professionals (and is the best value in the business).

%d bloggers like this: